How to setup GitLab on Laravel Forge
If you're a Laravel Forge user, it's really quite simple to setup GitLab by your own. There are only a few steps necessary to get everything done. Let's get started.
I assume that you've created already a new server which is managed by Laravel Forge. Additionally, to that I assume, that you have a domain available which should be used for GitLab but is not added at Forge yet. In my case, I use the domain gitlab.stefanbauer.me.
GitLab Domain
To start, add the domain you would like to use for GitLab at Laravel Forge. It doesn't matter what you choose for the document root.
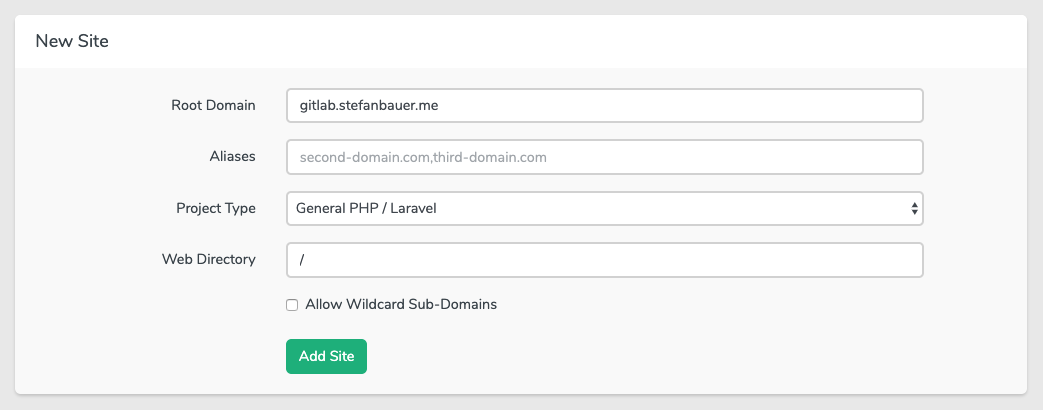
Don't install any repository after that. Just create an SSL certificate via Let's Encrypt.

GitLab Installation
Now SSH into your brand new server. To install GitLab, there are only a few commands necessary. First, we need to pull in the GitLab package repositories.
$ curl https://packages.gitlab.com/install/repositories/gitlab/gitlab-ee/script.deb.sh | sudo bash
After you did that, you can install GitLab. Export the environment variable EXTERNAL_URL and after that install it.
Here is one important thing though: Don't use SSL and therefore https yet. Otherwise, GitLab tries to configure itself with SSL and Let's Encrypt. We don't need and want that because we use Laravel Forge. No worries, we change it in some minutes.
$ sudo EXTERNAL_URL="http://gitlab.stefanbauer.me" apt-get install gitlab-ee
Now GitLab is installed. It's time to configure it.
Forge Configuration
Because GitLab is already running, we need to tell nginx that it should act as a proxy. Head over to your Laravel Forge account, click on your domain and edit the nginx configuration for that (in our case gitlab.stefanbauer.me) specific domain.

At the top, it's necessary to add the upstream of GitLab which we will use in the server directive later.
upstream gitlab-workhorse {
  server unix:/var/opt/gitlab/gitlab-workhorse/socket fail_timeout=0;
}
The root directory must be modified to
root /opt/gitlab/embedded/service/gitlab-rails/public;
The origin php directive can be removed entirely and replaced with the new location directive, which should look like this:
location / {
    client_max_body_size 0;
    gzip off;
    proxy_read_timeout      300;
    proxy_connect_timeout   300;
    proxy_redirect          off;
    proxy_http_version 1.1;
    proxy_set_header Host                $http_host;
    proxy_set_header X-Real-IP           $remote_addr;
    proxy_set_header X-Forwarded-Ssl     on;
    proxy_set_header X-Forwarded-For     $proxy_add_x_forwarded_for;
    proxy_set_header X-Forwarded-Proto   $scheme;
    proxy_pass http://gitlab-workhorse;
}
That's it for the Laravel Forge configuration. Here is the full configuration what we end up with.
# FORGE CONFIG (DO NOT REMOVE!)
include forge-conf/gitlab.stefanbauer.me/before/*;

upstream gitlab-workhorse {
  server unix:/var/opt/gitlab/gitlab-workhorse/socket fail_timeout=0;
}

server {
    listen 443 ssl http2;
    listen [::]:443 ssl http2;
    server_name gitlab.stefanbauer.me;
    root /opt/gitlab/embedded/service/gitlab-rails/public;

    # FORGE SSL (DO NOT REMOVE!)
    ssl_certificate /etc/nginx/ssl/gitlab.stefanbauer.me/<hidden>/server.crt;
    ssl_certificate_key /etc/nginx/ssl/gitlab.stefanbauer.me/<hidden>/server.key;

    ssl_protocols TLSv1.2;
    ssl_ciphers ECDHE-RSA-AES256-GCM-SHA512:DHE-RSA-AES256-GCM-SHA512:ECDHE-RSA-AES256-GCM-SHA384:DHE-RSA-AES256-GCM-SHA384:ECDHE-RSA-AES256-SHA384;
    ssl_prefer_server_ciphers on;
    ssl_dhparam /etc/nginx/dhparams.pem;

    add_header X-Frame-Options "SAMEORIGIN";
    add_header X-XSS-Protection "1; mode=block";
    add_header X-Content-Type-Options "nosniff";

    index index.html index.htm index.php;

    charset utf-8;

    # FORGE CONFIG (DO NOT REMOVE!)
    include forge-conf/gitlab.stefanbauer.me/server/*;

    location = /favicon.ico { access_log off; log_not_found off; }
    location = /robots.txt  { access_log off; log_not_found off; }

    access_log off;
    error_log  /var/log/nginx/gitlab.stefanbauer.me-error.log error;

    error_page 404 /index.php;

    location / {
        client_max_body_size 0;
        gzip off;

        proxy_read_timeout      300;
        proxy_connect_timeout   300;
        proxy_redirect          off;

        proxy_http_version 1.1;

        proxy_set_header Host                $http_host;
        proxy_set_header X-Real-IP           $remote_addr;
        proxy_set_header X-Forwarded-Ssl     on;
        proxy_set_header X-Forwarded-For     $proxy_add_x_forwarded_for;
        proxy_set_header X-Forwarded-Proto   $scheme;
        proxy_pass http://gitlab-workhorse;
    }

    location ~ /\.(?!well-known).* {
        deny all;
    }
}

# FORGE CONFIG (DO NOT REMOVE!)
include forge-conf/gitlab.stefanbauer.me/after/*;
GitLab Configuration
Now that Laravel Forge is already configured, it's time to configure GitLab itself. Head over to your GitLab configuration file on your server which is located at /etc/gitlab/gitlab.rb. The following three parameters must be modified. Find them and update them. Don't forget to change http to https now.
external_url 'https://gitlab.stefanbauer.me'

nginx['enable'] = false

web_server['external_users'] = ['forge']
What you can change and what I suggest is the email configuration part. It's different from provider to provider. See this just as an example and update it to your needs. Don't forget to do this as via sudo or root.
gitlab_rails['gitlab_email_enabled'] = true
gitlab_rails['gitlab_email_from'] = 'gitlab@stefanbauer.me'
gitlab_rails['gitlab_email_display_name'] = 'GitLab'
gitlab_rails['gitlab_email_reply_to'] = 'gitlab@stefanbauer.me'

gitlab_rails['smtp_enable'] = true
gitlab_rails['smtp_address'] = "your.domain.com"
gitlab_rails['smtp_port'] = 465
gitlab_rails['smtp_user_name'] = "your-username@domain.com"
gitlab_rails['smtp_password'] = "XXXXXXX"
gitlab_rails['smtp_domain'] = "domain.com"
gitlab_rails['smtp_authentication'] = "login"
gitlab_rails['smtp_enable_starttls_auto'] = true
gitlab_rails['smtp_tls'] = true

gitlab_rails['smtp_openssl_verify_mode'] = 'none'
If everything is done, save the configuration, reconfigure GitLab and restart nginx with
$ sudo gitlab-ctl reconfigure && service nginx restart
That was it. Open your browser, give GitLab some minutes to start and enter your GitLab URL. If everything worked, you should be redirected to a "Reset password" form where you can define your initial password. The default username is root.
If you set up your email configuration you can test with the following command if your configuration works. First, start the rails console. If it's started, just send a test mail.
$ gitlab-rails console
Notify.test_email('your@email.com', 'Test subject', 'Test body').deliver_now
GitLab Runner Installation
If you would like to install and connect the GitLab runner, there are only a few commands necessary too.
$ curl -L https://packages.gitlab.com/install/repositories/runner/gitlab-runner/script.deb.sh | sudo bash
$ sudo apt-get install gitlab-runner
$ sudo gitlab-runner register
After you registered it, you will be asked about several things. Just enter whatever you need and you are good to go. Oh, and by the way. You'll find the token you need to register the runners in your GitLab administration panel.
Sidenote: I use docker for all my runners. If you are interested in an article how to set up the runners via docker and connect them to your GitLab installation, let me know.